Promotional Footers
Promotional Footers are automated printed footers that are triggered by a set of criteria, which could be for bounce back vouchers, additional information and feedback codes, this page includes the setup process for footers.
Promotional Footers Topics
Promotional Footer List
The promotional footer list displays all footers have been added with the following information:
-
Name
-
Description
-
Status
-
Start Date
-
End Date
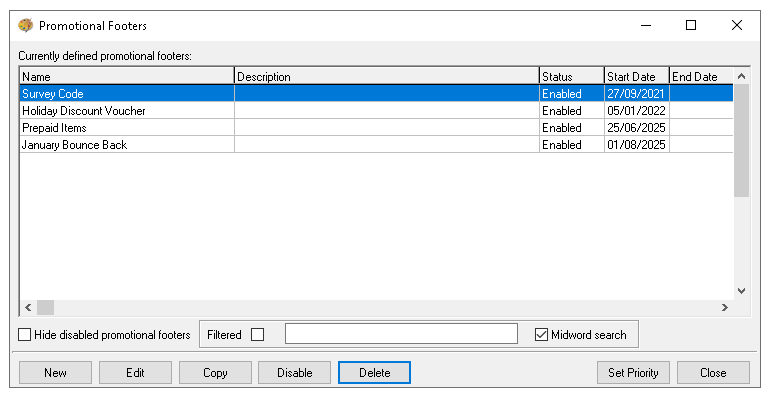
The search option provides a convenient way to locate a footer when there are many in the list, enter the search term and select the check box for 'Filtered' to apply the search.
Adding Promotional Footers
Follow these steps to add a new footers:
-
Click New
-
Enter the following details, Name, Description (optional) and Terminal Notification Text
When the footer activates based on the set criteria an additional prompt can be displayed to the POS operator to advise a footer has printed, this can be useful if the printer is not next the terminal -
Set the following other settings and options
-
Print Frequency
-
Always Print - the footer will print upon every activation
-
Print After Every X occurrences - the footer will print after each occurrence quantity set
-
-
Print With - determines which print type the footer will be printed with bill or receipt
Zonal recommends where organisations rarely print receipts using the 'Bill' option can be useful so that guests will always see the footer information generated with their bill, this setting is also useful when configuring a footer to include survey code information -
Separate Footer from Receipt - when enabled the footer will be printed separately to that of the receipt
-
Print Multiple Footers -
-
-
Optionally select Print Voucher Code and enter the Campaign ID
This setting will print a unique voucher code within the footer information, to use this feature organisations need to be integrated with Zonal Voucher Manager and have POS Integration Engine installed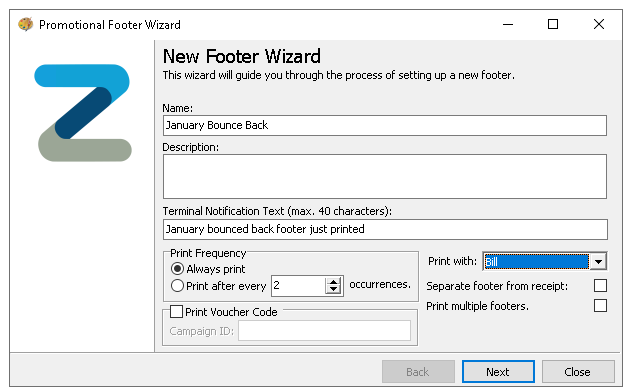
-
Click Next
-
Select the required Sites and Sales Areas from the Estate Structure which will apply to the footer
Expand the estate hierarchy to make selections and use the arrow buttons to add the selected locations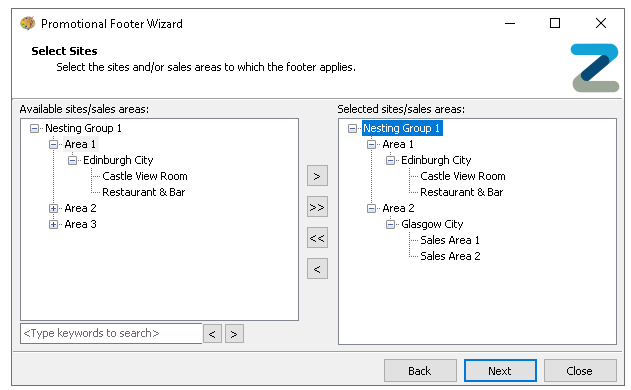
-
Click Next
-
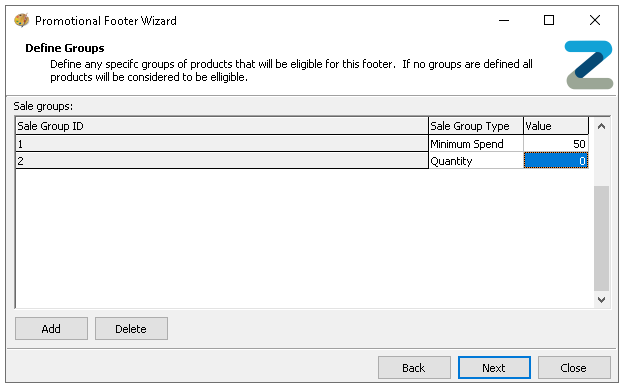
If required click Add | select the Sale Group Type
Clicking add will create a sale group where selected products can be assigned which must be ordered for the footer to be activated-
Minimum Spend - enter a minimum spend value
-
Quantity - number of products that much be purchased from the group
-
-
If groups are added from the Available Products list select the required products and portions that should be added to the group
Expand the product structure hierarchy to make selections and use the arrow buttons to add the selected sections or products
-
Click Next
-
If required assign any Promotions that must also be active on the account to trigger the footer
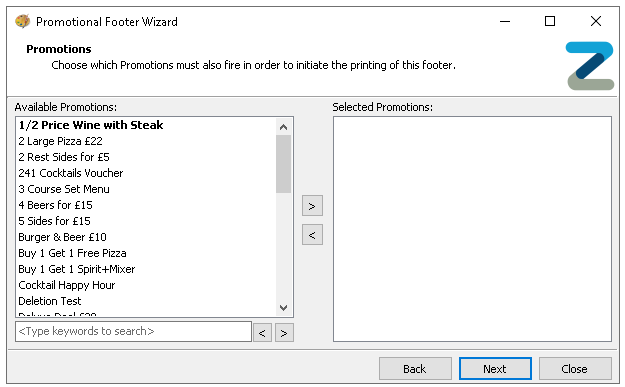 If no product added this step will appear after adding sites
 -
Click Next
-
Set the Activation Details with the following options
-
Start Date
-
End Date
-
Active Days / Times
-
Specific Time Periods
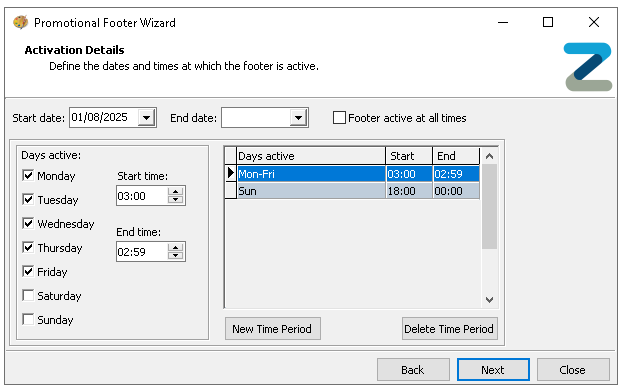 By default the start date is set to current days date and the footer is active at all times, deselect 'Footer active at all times' to create specific days / times and other time period settings
 -
-
Click Next
-
If required assign a Barcode to be printed on the footer by eitherC
-
Enter 12 digit barcode
-
Select a Product from the list that is assigned with the correct barcode
Products displayed in the list in black can be selected and then clicking 'Use Barcode'
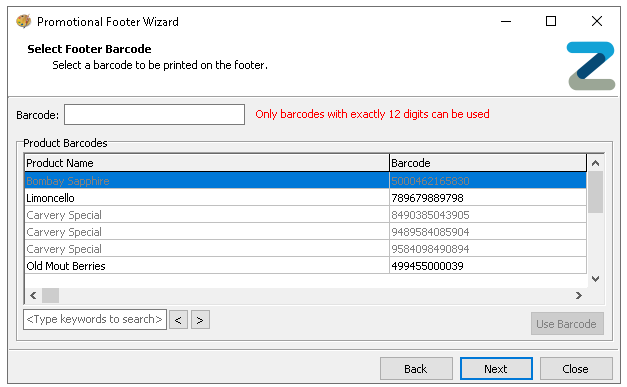
-
-
Click Next
-
Enter the Promotional Footer Text against the available 30 lines with the following configurations
-
Bold
-
Double Width
-
Append Voucher Code
If print voucher code was selected in step 4 this will be displayed - selecting the check box will automatically include the voucher code on the selected row -
Append Survey Code
If the selected sites have a survey code supplier selected in Theme Modelling → Site Setup → Miscellaneous → Receipt Survey Code Supplier this will be displayed - selecting the check box will automatically include the generated survey code on the selected row
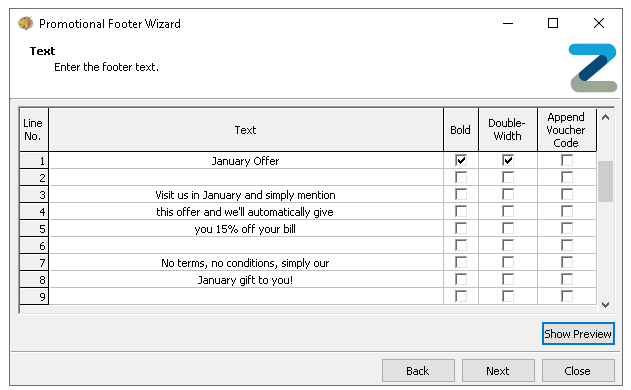
-
-
Click Next
-
Set if it sites can amend the footer configurations locally
By default all sites are enabled for overrides, if this is not required use the arrow buttons to move the selected locations to the left no override list - for more information for onsite override settings click here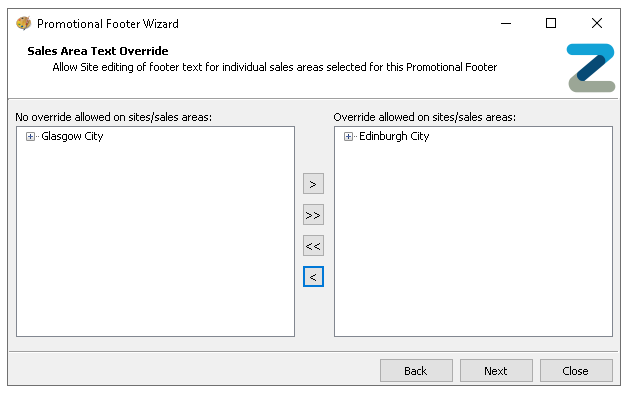
-
Click Next
-
Click Finish
Other Actions
Editing Promotional Footers
Follow these steps to edit a footer:
-
Select the required Footer from the list
-
Click Edit
-
Update each step as required, click Next until the end is reached, then click Finish
Copying Promotional Footers
Follow these steps to copy a footer:
-
Select the required Footer from the list
-
Click Copy
-
Enter a new Name and Description (optional)
-
Update each step as required, click Next until the end is reached, then click Finish
Disabling Footers
By default, when a footer is created, it is automatically assigned the status of 'Enabled'. Footers can also be set to 'Disabled' this is useful for retaining previously used footers without displaying them in the active list. For example, you might have a seasonal footer, such as a Christmas design, which can be enabled or disabled as needed.
Follow these steps to disable a footer:
-
Select the required Footer from the list
-
Click Disable
-
To reinstate click Enable